Drum brakes, often only found on the rear wheels, are designed to adjust themselves every time you reverse and apply the brakes. A ratcheting mechanism does this automatically and moves the brake shoes a fixed distance closer to the drums as friction material wears off. When this self-adjusting mechanism can’t keep up with shoe wear, it may need manual adjustment. A sign of this is when you need to pull the parking brake lever higher before it locks. To fix that, here’s a detailed set of instructions:
1) Safely lift the rear of the car.
Park on an even, solid surface. Put wheel chocks on both sides of the front wheels, jack up the rear, and rest the latter on jack stands. Make sure the parking brake is engaged and that the transmission is in neutral if working on a rear-wheel drive. If your car is front-wheel drive, put it in gear or Park.
2) Remove the rear wheels.
You should loosen the wheel nuts or wheel bolts on the car prior to hiking it up. That way, it’ll be easier to unfasten them.
3) Find the adjuster bolt or star wheel adjuster.
If you’re familiar with the drum brake arrangement your car employs, you may not need to take the drums off. Some setups utilize a bolt that you can adjust from the back of the carrier plate. Others have a hole on the carrier plate where you can insert a screwdriver or a special tool to turn the star wheel adjuster, moving the brake shoes closer to the drums. If you’re unsure, you’ll need to remove the drum, find the adjuster, and tweak it from the inside.
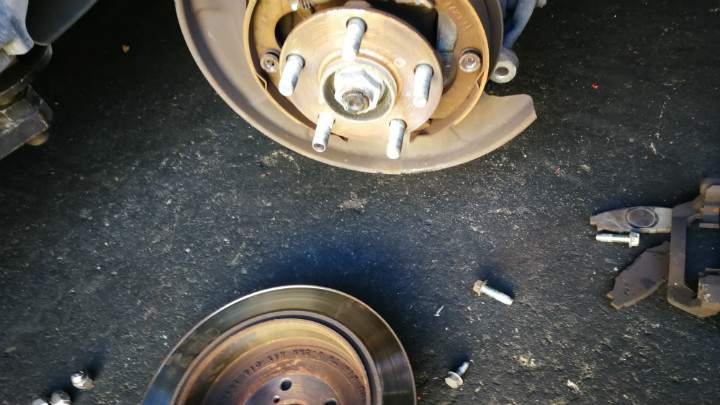
4) Remove the drums.
Most drums have a bolt hole or two where you can thread a bolt in to pry the drum off the wheel hub. Tightening the bolt will pop it out. If it’s rusted in place, light taps from a hammer or a rubber mallet around the rim of the drum will loosen the rust and caked up brake dust. Wiggle the drums out of the hubs.
5) Inspect brake parts.
Drum brakes are made up of a lot of elements assembled inside a tight package. Multiple levers and springs assure that shoe contact is distributed evenly and that they retract after use. Examine the wheel cylinders and the dust boots, confirming they’re not leaking with brake fluid. If a boot is torn, brake dust may damage the piston seal of the wheel cylinder. Minimum thickness for brake shoes is 3mm. Replace them if they appear thinner than that. When replacing the shoes, follow the correct shoe orientation—it is crucial for stopping efficiency. The star wheel adjuster, adjusting lever, and its spring must be undamaged for the automatic adjustment to work. Manual regulation may be possible but difficult. Change out parts that are busted. Check that the parking brake components are intact. Do that for passenger and driver sides, and note if the parking brake cable tension is equal on both sides.
6) Check for correct operation.
Have a companion disengage and engage the parking brake while you visualize the parking brake lever pushing out the brake shoes and the springs retracting them after. When the assistant steps on the brakes, you should also observe the proper engagement of the wheel cylinder pistons to the brake shoes. The return spring for the primary and the secondary shoes should work evenly to disengage the shoes from the drum as the brake pedal is released. No spring or lever should be binding. Do all of that for both sides.
7) Clean everything inside out.
The drum keeps water and dirt out but also retains worn shoe and drum material inside. Over thousands of kilometers, that amounts to a lot of rust and dust. Brake cleaner in aerosol cans are cheap and makes cleanup quick and easy. Even better results could be had with a water hose, dish soap, scouring pad, detailing brush, and a lot of elbow grease. Clean and dry all the brake components thoroughly.
8) Adjust both sides equally.
Depending on the type of adjuster, turn an adjuster bolt, star wheel, or ratchet wheel gradually, two or three clicks at a time. It’s easier to add tension than to decrease it. Reinstall the drum and spin it by hand after making sure the parking brake is disengaged. When working on a rear-driven axle, confirm that the transmission is in neutral and that the opposite wheel and drum are off the car. It should drag slightly so that manually rotating it is possible only by using both hands. If it’s loose, then remove the drum and add more tension on the adjuster. Put the drum back on and test again for snugness. Tighten until both sides are just as hard to spin.
9) Reassemble and test drive.
When putting back the drum over the hub, the threaded hole or holes should be aligned correctly. If you have some, put anti-seize compound on the threaded adjusters and adjuster levers to prevent binding. The self-adjusting mechanism will be more efficient.